Understanding the Combat Fundamentals
Elvenar’s turn-based combat system operates on a hexagonal grid where strategic positioning and unit matchups determine victory or defeat. Unlike many browser strategy games that use auto-resolve mechanics, Elvenar offers both manual and auto-fight options, with manual control consistently delivering superior results when mastered
.
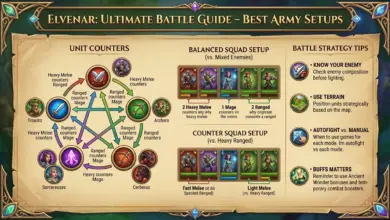
The combat system features five unit types arranged in a rock-paper-scissors dynamic known as the Combat Pentagon:
Light Melee (LM) → Strong against Light Ranged and Mages; Weak against Heavy Melee and Heavy Ranged Light Ranged (LR) → Strong against Heavy Melee and Heavy Ranged; Weak against Light Melee and Mages
Mages → Strong against Heavy Melee and Heavy Ranged; Weak against Light Melee and Light Ranged Heavy Melee (HM) → Strong against Light Melee and Light Ranged; Weak against Mages and Heavy Ranged Heavy Ranged (HR) → Strong against Light Melee and Heavy Melee; Weak against Light Ranged and Mages
Understanding these relationships is fundamental, but advanced combat requires deeper knowledge of initiative, terrain, and enemy behavior patterns.
The Initiative System: Who Moves First
Combat turns are determined by initiative values – lower numbers move first. This system creates crucial tactical considerations:
High Initiative Units (Move First):
- Light Melee: Initiative 6-9
- Light Ranged: Initiative 6-9
- Mages: Initiative 6-9
Low Initiative Units (Move Later):
Critical Insight: When units have the same initiative, tie-breakers go by position number (5,4,3,2,1 from top to bottom on the battlefield)
. This means your unit placement directly affects attack order.
Manual Fighting vs Auto-Fight
Why Manual Fighting Dominates
Experienced players consistently report that manual fighting yields significantly better results than auto-fight, especially in challenging encounters
. The AI is “dumb as a box of rocks” – great when you’re fighting against it, terrible when it controls your troops
.
Key Advantages of Manual Control:
- Positioning Control: You decide exactly where each unit moves
- Target Selection: Choose which enemy to attack based on threat priority
- Retreat Tactics: Strategic withdrawals to preserve units
- Terrain Utilization: Use obstacles to block enemy movement
- Bait and Switch: Lure enemies into unfavorable positions
When to Use Auto-Fight
Auto-fight has its place for efficiency:
- First 10 tournament provinces where squad sizes heavily favor you
- Very Easy (blue) world map provinces
- When you’re heavily buffed with temporary buildings
- Farming repeat encounters where losses don’t matter
However, auto-fight becomes increasingly unreliable in later tournament provinces (around province 20+) where enemy squad sizes double yours
.
Advanced Manual Fighting Tactics
The Scouting Technique
Before committing your full army, send a single high-initiative unit (like a Ranger or Light Melee) to scout the battlefield. This allows you to:
- Examine terrain obstacles
- Identify enemy unit types and positions
- Plan your approach
- Retreat without losses if the situation looks unfavorable
Pro Tip: If enemy Mist Walkers are present, use an Orc Strategist for scouting since they have debuffs against Light Range and can survive the initial strike
.
The Three Response Framework
When making any move, consider three immediate responses
:
- Attack a vulnerable unit – Strike where you have buff advantages (e.g., Archers vs. Mages)
- Attack the next enemy to move – Reduce their hit strength before they act
- Position for future advantage – Move to block enemies or prepare for next turn
Engagement Discipline
Golden Rule: Move forward only enough to engage the enemy. Make the enemy expose themselves by moving into your territory rather than rushing into theirs
.
This conservative approach:
- Prevents overextension
- Allows counter-attacks
- Maintains formation integrity
- Reduces exposure to enemy range
Kiting and Bait Tactics
Advanced players use movement to manipulate enemy AI:
The Chase Scenario: Two slow Heavy Melee units chasing a fast Light Melee (Cerberus with initiative 9) while Heavy Ranged units slowly eliminate them from safety
.
Implementation:
- Position fast unit just within enemy movement range
- Enemy wastes turn moving toward you
- Retreat to safe distance
- Repeat while ranged units deal damage
This works because “the enemy units never skip a turn and rarely retreat” – they will chase indefinitely while your ranged units destroy them
.
Unit-Specific Strategies
Light Melee: Cannon Fodder or Precision Tool?
Light Melee units (Sword Dancers/Axe Barbarians/Cerberus) are controversial. While they have advantages against Mages and Light Ranged, they’re often considered weak due to:
- Slow movement allowing enemies free hits
- Vulnerability to Heavy units
- Difficulty reaching backline Mages
Expert Verdict: “I don’t train any Sword Dancers. They are free from Bulwark. I might use her to clear map provinces since they are all Very Easy”
Exception: Cerberus become viable with promotions and are particularly effective against Abbots (Mage units)
.
Mages: The Critical Unit
Mages (Sorceress/Priest/Blossom Mage) are essential for defeating Heavy Melee and Heavy Ranged units.
Race Difference: Human Priests are significantly superior to Elven Sorceresses. “Priest is the best mage unit in the game” while Sorceress is “the weak point of the entire elven military”
. Elves must wait until Chapter 7 (Fairies) to get the Blossom Mage for a truly competitive Mage unit.
Tactics:
- Protect Mages from Light Ranged (especially Mist Walkers)
- Use Heavy Melee as meatshields
- Prioritize eliminating enemy units that can reach your Mages
Heavy Melee: The Reliable Tank
Heavy Melee (Treants/Paladins) excel at absorbing damage and protecting vulnerable units.
Key Difference: Human Paladins have range 2 vs. Elven Treants’ range 1, making Paladins more reliable for auto-fight and better at reaching enemy ranged units
.
Best Use: Position between your ranged units and enemy melee to absorb attacks while your damage dealers eliminate threats.
Heavy Ranged: Damage Dealers
Heavy Ranged (Golems/Mortars/Orc Strategists) provide devastating damage from safety.
Critical Insight: “Golems are WAY++ better than Mortars”
. Mortars are considered “the most useless unit in the game” until the Frog Prince unlocks in late chapters.
Orc Strategist Exception: These Training Ground units are excellent against Light Range and serve as viable alternatives when Golems aren’t available
.
Province-Specific Strategies
Marble Provinces
Enemies: Heavy Melee, Heavy Range, Light Range (Orc General, Knight, Cannoneer, Mist Walker)
Strategy:
- Early Game: Light Range (Archers/Crossbow) as key units, despite vulnerability to Cannoneers. Use Light Melee support .
- Mid/Late Game: Mages (Sorceress/Priest/Blossom Mage) as primary damage dealers. Protect them from Mist Walkers .
Support Options: Light Range work well against Heavy Melee but avoid Cannoneers. Heavy Range (Orc Strategist) excel against Mist Walkers
.
Steel Provinces
Enemies: Heavy Melee, Light Melee, Mage (Swamp Monster, Orc Warrior, Thornrose Mage, Thief)
Strategy: Light Range (Archer/Crossbow/Ranger/Dryad) are key units with bonuses against Heavy Melee and Mages. Eliminate Thieves first as they have strong attack bonuses despite no defense
.
Planks Provinces
Enemies: Heavy Melee, Light Melee, Light Range (Orc General, Ancient Orc, Bandit, Dryad)
Strategy: Heavy Range (Golem/Mortar/Orc Strategist) as key units. Focus on eliminating Ancient Orcs first since Heavy Range have minimal defense against them
.
Tournament-Specific Tactics
The Scaling Challenge
Tournament difficulty scales with province number and round:
- Provinces 1-10: Extremely easy, “people tried losing and couldn’t”
- Provinces 15-20: Moderate difficulty, requires attention
- Province 20+: Enemy squad sizes double yours, designed to be unwinnable without buffs
Composition Adjustments
As you progress deeper into tournaments, fights take longer and often devolve into “melee brawls” where ranged units become vulnerable
.
Adaptation: “You need to adjust for possibly needing to sprinkle more melee units into the mix the further/deeper you go into Tourney”
A fight composition that works in Province 4 may fail in Province 24 with identical enemy types – adjust for duration and chaos.
Common Mistakes to Avoid
1. The All-Same Brute Force Method
Using five identical units is simple but suboptimal. “If you understand starting position, you can ween off the ‘brute force’ method of one unit type for all 5 slots”
.
2. Ignoring Terrain
Obstacles on the battlefield can block movement and create bottlenecks. Always scout to identify terrain issues before committing troops
.
3. Poor Unit Positioning
Unit placement affects attack order. Remember: “In a fight of all same units, your units will fight in the order of 5,4,3,2,1” from top to bottom
.
4. Attacking Without Planning
Don’t just click the nearest enemy. Consider:
- Who moves next?
- Can you eliminate a threat before it acts?
- Are you exposing vulnerable units?
5. Neglecting Squad Size
Your squad size relative to the enemy determines fight difficulty. Research squad size technologies and adjust your world map scouting strategy to maintain favorable ratios
.
Mobile vs Desktop Combat
Critical Limitation: The mobile app only offers auto-fight, removing the manual control advantage
. Mobile players should:
- Focus on troop composition over tactics
- Accept higher losses
- Consider using desktop for important fights
- Complain to InnoGames about the disparity
Final Thoughts: The Path to Mastery
Mastering Elvenar combat requires patience and practice. Start with these principles:
- Learn the Combat Pentagon – Know your unit matchups
- Scout Before Fighting – Never commit blindly
- Control the Engagement – Let enemies come to you
- Protect Your Damage Dealers – Use tanks to screen ranged units
- Adapt to Scaling – Adjust compositions for fight duration
- Practice Manual Control – It’s superior to auto-fight when learned