Introduction: Laying the Foundation for Success
Elvenar is a game of patience, strategic planning, and efficient resource management. Whether you’ve just begun your journey as an Elf or Human ruler, or you’re looking to optimize an established city, understanding core strategic principles will transform your gameplay experience. This comprehensive guide covers essential tips from early-game fundamentals to advanced optimization techniques, helping you build a thriving metropolis that stands the test of time
.
Early Game Strategy: Your First Steps
Choose Your Race Wisely
Your journey begins with a crucial decision: Elves or Humans. While both races share identical core mechanics ensuring balanced gameplay, their distinct aesthetics and unit compositions create different experiences. Elves embody magical sophistication with nature-connected architecture, while Humans represent industrial medieval determination with sturdy, practical designs
. If you’re uncertain, consider creating accounts on different servers to experience both races—there’s no penalty for exploring both options
.
Follow the Storyline Quests
New players often overlook the importance of storyline quests, but these serve as your tutorial and early-game accelerator. These guided missions introduce core mechanics gradually while providing valuable rewards including Coins, Supplies, and even premium Diamonds. Beyond resources, quests unlock new buildings, technologies, and game features that expand your capabilities. Never ignore these narrative-driven objectives—they’re designed to prevent overwhelming new players while ensuring steady progression
.
The Eight Residence Rule
Establish your population foundation early by building at least eight residences. These structures provide both housing and Coin income through taxation. Position them strategically near cultural buildings to maximize productivity bonuses. Simultaneously, construct workshops to begin Supply production—essential for construction, upgrades, and military training
. This dual-focus on population and production creates the economic engine that powers all future expansion.
Resource Management Mastery
The Knowledge Point Strategy
Knowledge Points (KP) are your progression currency, regenerating at one per hour (maximum 10 stored). Never let your KP bar fill completely—wasted regeneration stalls your advancement. However, there’s a powerful trick: scout nearby provinces on the world map and solve encounters. Each completed encounter awards 1 KP instantly plus valuable relics, bypassing the hourly limit entirely when you’re eager to progress
. This technique transforms the world map from passive scenery into an active KP farm.
Production Optimization
Workshops offer multiple production cycles—from 5 minutes to 1 day. Match your selection to your play schedule: 5-15 minute cycles for active play sessions, 1-hour cycles for regular check-ins, and 9-hour cycles for overnight
. Shorter orders always yield better efficiency than longer ones; two 3-hour orders outproduce one 9-hour order in the same timeframe. For endgame efficiency, maintain minimum 8 workshops set to 1-hour cycles for quest completion
.
The Boosted Goods Focus
Check your Main Hall to identify your production-boosted goods—these receive significant bonuses from collected relics. Focus your manufacturing on these boosted types and trade for others rather than building diverse factories. This specialization creates massive efficiency advantages, particularly as you advance to Crafted Goods (Scrolls, Crystal, Silk) and Magical Goods (Elixir, Magic Dust, Gems)
. One boosted manufactory often outproduces three unboosted alternatives.
City Layout and Space Optimization
The Road Efficiency Principle
Roads are necessary evils—they consume space while providing only culture bonuses. Minimize them ruthlessly by following golden rules: never place roads at city edges (they only serve one building), position narrow building edges toward roads (a 3×2 building should show its 2-square side to the road, saving 20+ road blocks), and ensure roads serve at least two buildings
. The difference between efficient and inefficient road networks can free space for an entire additional building.
The Corner Main Hall Strategy
Place your Main Hall in a corner with no more than 2 roads leading from it. This bulky, awkwardly-sized structure dictates your entire layout if centered—corners minimize road waste and free prime space for productive buildings. Veteran players recommend the top corner, building streets downward and sideways. There will come a day when you desperately need to move it; establish this efficient foundation early when fewer buildings require relocation
.
Culture Building Placement
Counter-intuitively, place culture buildings in the CENTER of your city, not the edges. This allows maximum-length straight roads at the perimeter where they’re most efficient. Since culture buildings don’t need road access, central placement optimizes space usage perfectly while freeing edge space for road-dependent structures
. Group all culture buildings together in rows, with your Builder’s Hut alongside them—neither requires roads, so keep paths far away
.
The Double Spiral Design
For maximum efficiency, implement advanced layout principles: zero crossroads (keep roads straight until hitting corners), place biggest buildings at road ends (only need 1 road square), group same-sized buildings together for easy reorganization, and expand in perfect squares (5×5, 6×6, 7×7) to maintain optimal ratios
. When restructuring, use spare expansions as staging areas—move buildings to temporary spaces while reorganizing, then return them to optimized positions
.
Military and Combat Strategy
Understanding Unit Classes
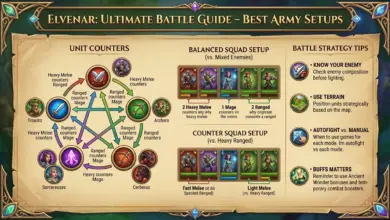
Elvenar features five unit classes with distinct roles: Light Melee (balanced frontline), Heavy Melee (tank units), Light Ranged (high-damage shooters), Heavy Ranged (armored shooters), and Mages (support units)
. Each race trains five unique units in their Barracks, plus ten shared units in the Training Grounds and Mercenary Camp. While stats are balanced between races, tactical styles differ—Human Light Melee hits harder but defends weaker, while Elven versions are more balanced
.
Combat Formation Tactics
The order you place troops matches the opposing lineup order. Default strategy: place Archers/Rangers opposite Mages and Heavy Melee, Banshees opposite Heavy Ranged, Orc Strategists opposite Light Ranged, and Golems opposite Light Melee
. However, adapt based on battlefield terrain—use obstacles to create bottlenecks protecting fragile ranged units while melee forces engage.
For manual fighting, deploy fast Light Melee first to scout terrain, then position your army based on enemy formation. Retreat Light Ranged into back corners when facing Mages to avoid first-round shredding, bringing them out after melee troops have engaged
. This “snatch victory from defeat” technique often turns losing auto-fights into wins through strategic positioning.
The Niche Unit Advantage
When standard lineups fail, deploy “ignored” units with highest stats: Drone Riders, Sinister Cerberus, Vallorian Veterans, and Gruff Orcs. Substitute Dogs opposite Mages, Drones opposite Light Ranged, Veterans opposite Heavy Ranged, and Gruff Orcs opposite Light Melee. You’ll lose troops but secure victory against seemingly impossible encounters
. These units require manual control but excel in specific matchups where conventional strategies fail.
Advanced Progression Strategies
Ancient Wonder Prioritization
Ancient Wonders provide powerful passive bonuses but require significant investment. Priority for new players: Golden Abyss (population boost) and Mountain Halls (population concentration). At maximum level, each provides 18% population discount—combined they save over 700,000 population in late-game, freeing massive space for other buildings
. These general-use wonders benefit any playstyle, whether fighting or catering-focused.
Timewarp becomes essential for active players, reducing tournament cooldowns from 16 hours to near-instant with high levels and fed Polar Bear—transforming tournament participation from spread-out obligation to single-session completion
.
The “Max Before Adding” Rule
Focus on maximizing 1-2 Ancient Wonders before adding new ones. This creates hugely beneficial buildings with highly efficient benefits per square. Wonder costs increased significantly in recent updates, making concentrated investment more important than scattered low-level wonders
. A level 30 wonder provides exponentially better returns than ten level 3 wonders occupying the same space.
Short-Term vs. Long-Term Balance
Decide your progression philosophy early. Short-term strategy prioritizes rapid technology advancement through the research tree—fast progress but minimal wonders until “end-game.” Long-term strategy invests heavily in wonders early, accepting slower chapter progression for powerful permanent benefits
. Most successful players find balance: allocate daily KP between technologies and wonders, adjusting based on current needs. Approaching guest races or competitive tournaments may demand temporary focus shifts.
Community and Trading Optimization
The 3-Star Trading Trick
Make trades irresistible by offering 2 units less than the default amount. This creates a “3-star offer” appearing at the top of other players’ trade lists, accepted within minutes even in saturated markets
. The rapid turnover means faster resource acquisition than full-price trades sitting for days. Since InnoGames changed cross-tier balance ratios from 1:4 to 1:1.5, cross-tier trading stigma has reduced significantly
.
Fellowship Selection and Participation
Join an active Fellowship early. These 25-player groups enable resource trading, mutual aid, and coordinated chat. Helping Fellowship members generates bonus rewards when they return the favor. Check city names when visiting—many players indicate preferences like “Culture please!” or specific building help requests
. Motivate their strongest culture buildings for maximum mutual benefit.
Quality of Life Enhancements
Swipe-to-Collect Efficiency
Click and hold on one ready building, then swipe across all other ready buildings to collect resources instantly. This cuts collection time by 90% compared to individual tapping
. Combine with fully zoomed-out view to spot all harvestable buildings across your expanding kingdom.
Batch Production Setup
Click the circle icon when selecting production to apply the same item to all identical buildings simultaneously. For Workshops, this works across all buildings. For Manufactories, it batches identical types at the same upgrade level—upgrade in pairs for maximum efficiency
.
Keyboard Shortcuts
When resetting production, press number keys 1-6 to select options quickly: 1=5min, 2=15min, 3=1hr, 4=3hr, 5=9hr, 6=1 day for Workshops; 1=3hr, 2=9hr, 3=1 day, 4=2 days for Manufactories . Use arrow keys to navigate the world map without mouse clicking.
Conclusion: Patience and Persistence
Elvenar rewards strategic thinking over rushed expansion. The most successful cities result from patient optimization—efficient road networks, focused production, balanced wonder investment, and active community participation. Whether you prefer peaceful trading or military conquest, these strategies provide the foundation for building not just a city, but a lasting legacy in the magical realm of Elvenar.