Introduction: Beyond the Basics
Elvenar is a game of patience, strategy, and efficient resource management. While beginners focus on simply keeping their city running, advanced players understand that success lies in optimizing every grid square, every production cycle, and every interaction. This comprehensive guide reveals the sophisticated tricks and professional strategies that separate thriving metropolises from struggling settlements, helping you maximize efficiency and accelerate your progression through the chapters
.
Resource Generation Secrets
The Instant Knowledge Point Hack
Waiting 10 hours for your Knowledge Point (KP) bar to refill is a beginner’s mistake. Professional players scout nearby provinces on the world map and solve encounters—each completed encounter awards 1 KP instantly plus valuable relics
. This technique bypasses the hourly regeneration limit entirely, allowing rapid research progression when you’re eager to unlock new technologies. Scout continuously as long as you have sufficient Coins and Supplies, turning the world map into your personal KP farm rather than a passive waiting game
.
Coin Generation Beyond Taxation
Running low on Coins? Don’t just wait for residence collections. Visit other players’ cities and “help” them with their current quests. This generates bonus Coins without spending resources, and Fellowship members can help each other for mutual Coin rewards
. Additionally, completing encounter negotiations on the world map provides substantial Coin rewards, creating a virtuous cycle where exploration fuels both research and economy
.
The 3-Star Trading Advantage
Make your trades irresistible by offering 2 units less than the default amount. This creates a “3-star offer” that appears at the top of other players’ trade lists and gets accepted within minutes, even when the market is saturated
. While the discount seems minor, the rapid turnover means you acquire needed resources faster than competitors posting full-price trades that sit for days. This trick is especially powerful for cross-tier trading, where the stigma has reduced since InnoGames changed the balance ratio from 1:4 to 1:1.5
.
City Layout Optimization: The Science of Space
The Corner Main Hall Strategy
Place your Main Hall in a corner with no more than 2 roads leading from it. This bulky, awkwardly-sized building dictates your entire layout if centered—corners minimize road waste and free up prime space for productive buildings
. Veteran players recommend the top corner, building streets downward and sideways from there. There will come a day when you desperately need to move it; better to establish this efficient foundation early when fewer buildings require relocation
.
Road Efficiency Mathematics
Roads are space parasites—minimize them ruthlessly. Follow these golden rules:
- Never place roads at city edges—they only touch one building, wasting space
- Put narrow building edges toward roads: A 3×2 residence should have its 2-square side touching the road, not the 3-square side. This simple rotation can save 20+ road blocks—enough for an extra building
- Roads should serve two buildings minimum—avoid dead-end roads entirely
- Overwrite roads when upgrading: Drag new road types directly over old ones—no deletion required
The Counter-Intuitive Culture Placement
Place culture buildings in the CENTER of your city, not the edges. This allows maximum-length straight roads at the perimeter where they’re most efficient. Since culture buildings don’t need road access, central placement optimizes space usage perfectly while freeing edge space for road-dependent structures
. Group all culture buildings together in rows, with your Builder’s Hut alongside them—neither requires roads, so keep paths far away
.
The Double Spiral Design
For maximum efficiency enthusiasts, implement these advanced principles:
- Zero crossroads—keep roads straight until hitting corners
- Place biggest buildings at road ends (only need 1 road square)
- Group same-sized buildings together for easy reorganization
- Expand in perfect squares (5×5, 6×6, 7×7) to maintain optimal ratios
When restructuring, use spare expansions as staging areas. Move buildings to temporary 5×5 spaces while reorganizing, then return them to optimized positions. Don’t fear demolition—rebuilding from scratch often yields better results than incremental adjustments
.
Production Mastery
The Swipe-to-Collect Technique
Click and hold on one ready building, then swipe across all other ready buildings to collect resources instantly. This cuts collection time by 90% compared to tapping individually
. Combine this with fully zoomed-out view to spot all “harvest-ables” easily across your expanding kingdom
.
Batch Production Setup
Click the circle icon when selecting production to apply the same item to all identical buildings simultaneously. For Workshops, this works across all buildings. For Manufactories, it only batches identical types at the same upgrade level—so upgrade in pairs for maximum efficiency
. This trick transforms tedious individual clicking into streamlined mass production.
The 9-Hour vs. 1-Day Calculation
Shorter orders always beat longer ones in efficiency. Two 3-hour orders outproduce one 9-hour order in the same timeframe, and the difference increases with shorter cycles. For Workshops, 5-minute orders provide maximum yield if you can maintain active play
.
However, match production to your schedule: 9-hour orders for overnight, 1-day orders only if you’ll be offline 24+ hours. Setting 1-day orders when you check in twice daily actually loses resources compared to shorter cycles
.
Workshop Optimization for Endgame
Endgame players need minimum 8 Workshops set to 1-hour cycles for quest efficiency. Remove excess manufactories (down to 2 per tier) to free massive population for upgrades
. With a maxed Prosperity Towers Ancient Wonder and Power of Provision spells, 2 Magical Workshops can replace 9 normal ones, saving enormous space while maintaining production
.
Combat and World Map Tactics
Selective Scouting Strategy
Don’t “joy-scout” randomly. Prioritize provinces based on your needs:
- Need trading power? Target provinces with relics matching your boosted goods
- Need land expansions? Check Province Overview and target “easy” difficulty provinces
Remember: each consecutive expansion requires completing one more province than the last. First expansion needs 1 province, second needs 2, third needs 3, and so on
.
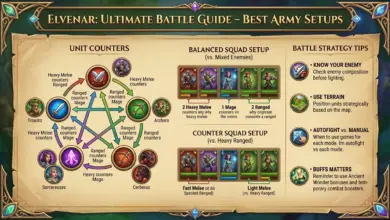
Combat Damage Mechanics
Units deal identical damage regardless of stack size—32 Berserkers hit as hard as 1 Berserker until they die. Always finish off enemy stacks completely rather than spreading damage, and prioritize eliminating threats over damaging multiple units
. Use terrain obstacles to create bottlenecks, protecting fragile ranged units while melee forces engage
.
Army Composition Math
Building more Armories isn’t always better. 2 Armories suffice for active players checking twice daily; 4 Armories for players checking less frequently. Balance based on your login schedule, not maximum capacity—excess armories waste population and space that could support production buildings
.
Ancient Wonder Strategies
The “Max Before Adding” Rule
Focus on maximizing 1-2 Ancient Wonders before adding new ones. This creates “hugely beneficial buildings with highly efficient benefits per square,” saving space for other content. Wonder costs increased significantly in recent updates, making this strategy essential
.
Priority Wonders for New Players
- Golden Abyss (population boost)
- Mountain Halls (population concentration)
- Timewarp (tournament cooldown reduction—game-changing for active players)
These provide general benefits that remain useful throughout all game stages. At maximum level, Golden Abyss and Mountain Halls each provide 18% population discount, totaling over 700,000 population savings in late-game
.
Spell Fragment Farming
During events, target large daily reward buildings (16+ squares) specifically for disenchanting. These provide massive Spell Fragment returns perfect for “Crab Hotels” (high-turnover crafting). Also stockpile Portal Profits from Trading Stations for emergency fragment needs
. Artifacts disenchant for 2000 fragments each—if you have duplicates or decide against certain evolving buildings, these become valuable resources
.
Advanced Fellowship and Trading
The Neighborly Help Optimization
When visiting cities, check their town name—many players change it to indicate preferences like “Culture please!” or “Polish please!”
. Motivate their strongest culture buildings for maximum mutual benefit. This reciprocal system generates extra rewards when they return the favor
.
Cross-Tier Trading Mastery
Since InnoGames changed the balance ratio from 1:4 to 1:1.5, cross-tier trading stigma has reduced significantly
. However, ensure your Fellowship has diverse boosted goods producers—if everyone trades down, nobody supplies the lower tiers. Specialize in your boosted goods, trade for everything else, and maintain production diversity within your group
.
Diamond and Premium Efficiency
Smart Diamond Spending
If purchasing Diamonds, prioritize:
- Premium cultural buildings (permanent benefits)
- City expansions (permanent space)
- Builder’s Huts (permanent construction slots)
Avoid spending on instant completions or temporary conveniences—these provide poor long-term value. Patience is cheaper than diamonds
.
Quick Reference: Essential Shortcuts
Table